
Are you ready to learn how to start a food forest on your property? A food forest is an excellent way to provide food for your family year after year.
Becoming more self-reliant means growing as much of our own food as possible. After researching the best ways to grow more food in our tropical climate here in Florida, I started researching permaculture techniques and came across the idea of an edible food forest.
Just so you know: This post contains affiliate links; if you click on a link and make a purchase I might make a small commission, but it does not affect the price you pay! For more information, please see my Affiliate Disclosure.

The idea of using what naturally is available mixed with methods of rejuvenating the dry arid soil we currently had, seemed as if it was the best option. So started my journey to developing an edible food forest on our own homestead.
Imagine walking outside and being able to pick fruit from your own trees, fresh strawberries off the vine, and more. That’s what a food forest provides for you and your family. And it provides that nutrition year after year!

In this post, I will teach you step-by-step how to start a food forest on your property. Remember that our climate and weather will probably be different than yours so you may to adapt your plants and other aspects to your climate, soil, and preferences.
Also keep in mind that you can start a food forest in your backyard! It does not have to be on the edge of a forest!

Why We Chose to Start a Food Forest
Our homestead has definitely been a challenge when it comes to growing food. Our soil is sand, 100% light tan, fine sand. It is almost impossible to grow anything successfully except weeds and native plants without completely amending the soil first.
Cactus grows well, so outside of the Prickly Pear Cactus which bears an edible fruit, and a ton of Beauty Berry bushes, which we produce some jam and syrup with, everything else requires many additives and compost to grow.

Rain hits the ground and disappears leaving behind no sign of its presence. Raised beds help contain the new soil and nutrients we add but the intense heat causes the raised beds to dry out quicker than the beds we dug directly into the soil.

And if our soil wasn’t useless enough, we have climate issues too. Our summers are either scorching with 100% humidity or raining to the point where everything washes away or is drowned by a large amount of rainfall that falls over shorts bursts of time.
Our winters are mild, yet we get that surprise week where temperatures fall to the lower 30’s followed by 60, 70, and sometimes 80 degree days. The constant yet eccentric conditions in the weather cause the plants to simply never know what they are actually supposed to be doing.

It gets cold and the plants go dormant, then the days hit 80 degrees and they flower and thrive, then the temperature drops again, leaving the plants in a state of confusion. Therefore, they don’t really get a chance to adapt.
The answer to these issues, for us was to start a food forest.
What is a Food Forest
You need to understand what a food forest is before you can start your own. It is important to understand the structure and the principles behind this form of gardening.
A food forest is basically a natural habitat where tall trees grow over smaller trees, followed by an outer layer of shrubs and bushes, which are then surrounded by edible plants. It does not need human intervention to grow and thrive, just some attention to getting started and established.

Each layer of this food forest has a purpose and works to protect or help other layers produce. You can add just about any type of food plants you choose, as long as you choose the correct location.
Being mostly perennial plants, there is no need to till the soil. This allows all the microbes and ‘soil critters’ to do their job which means very fertile soil.
Because the trees and shrubs maintain deep roots they become drought tolerant, all while protecting the plants beneath them. This whole process allows the environment of a food forest to become lush and self-maintaining.

The Layers of a Food Forest
The Canopy
These are the tallest trees, native to the soil they are growing. This layer provides the most shade and protection from the sun and the elements yet still allowing enough sunlight to the trees below.

The Understory
This layer includes smaller fruit and nut trees that are usually grown on dwarf or semi-dwarf rootstock. Peach. apricot and mulberry are excellent examples of this layer.

Shrubs Layer
This layer is usually filled with fruiting bushes like currents and berries. The Butterfly bush and Goji berries are good examples of this layer.

Herb Layer
Herbs in this layer simply mean non-woody vegetation: vegetables, flowers, culinary herbs, and cover crops, as well as mulch producers and other soil-building plants. Asparagus, Calendula, and Dill are examples.

Ground Cover
This layer normally has edible plants that spread horizontally. Strawberries, clover, and creeping time are all good examples here.

Vines
This layer normally has vines and climbers that grow on other nearby plants and trees. Examples include Kiwi, grapes, and passionflower.

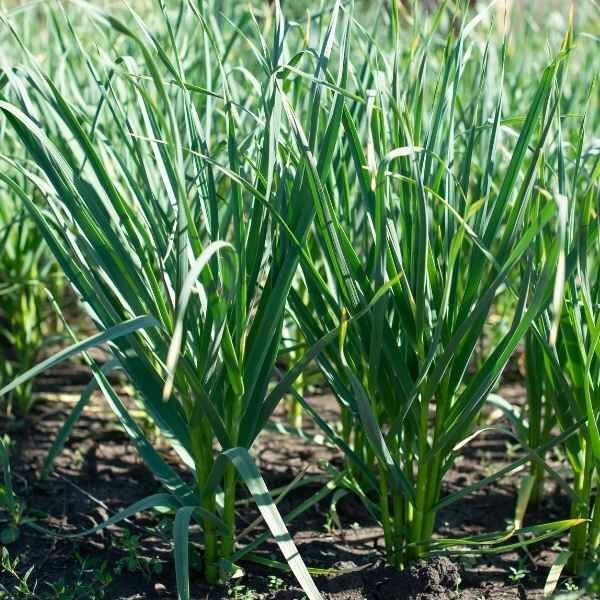
Roots
These are the plants that are usually harvested for their roots. Onions and garlic are good examples.
Creating these seven layers can be quite a challenge. This is not an instant type garden. It takes time to grow and mature.
Choosing a Location to Start A Food Forest
The location of your food forest will determine how well it performs. Although, if you have the ability to start with towering trees, great soil, and established plants already on your property, then lucky you!
To get started you must select an area that receives sun and shade.

As far as size, any size will work. You may have to adjust your plants to the size food forest you choose. We selected the front yard. It measures about 380 or so feet from east to west and about 80 feet from north to south.
Once you choose where to start your forest you may wish to fence it in. We chose to fence it in to protect the newly established plants from the wildlife. We may remove the fence once it is better established and can stand on its own.

Please remember to take into consideration the areas that get full sun now may not get full sun during other seasons. The same goes for the current shaded areas.
So if you plant something that will thrive in full sun, make sure you are planting in the right season and where that plant will actually receive full sun.
Planting Your Food Forest Plants
Once the location of your food forest is decided, it is time to start planning everything out. It may make sense that you should start with your soil. However, I recommend you start the tallest trees or the canopy layer.
Once you decide what species of trees you will plant and where to plant them, you will start with the soil for the trees. Then as you work through each layer, you can add and change the soil as needed.

We did not purchase new trees. Instead we chose to work with what we already had. We had some Loquat saplings, four banana pups, and two 30′ tall trees that I thought were Maples. Those Maple trees ended up being Sweet Gum trees.
We also have quite a few live oaks and other oak trees. Those oaks are not directly in my fenced-in area. However, they are close by and tall enough to provide some shade for our food forest.

If money is an issue you may have to start by using what you have. If you can afford to make some tree purchases, then you need to decide which trees would be right for your food forest.
Choose Your Trees
There are 3 things to keep in mind when you choose your trees.
- Whether the species of the trees you choose grows in your climate naturally
- The purpose of the trees
- The maintenance requirements of the trees
Choosing Trees Specifically for your Climate
This one is pretty self-explanatory. Basically, don’t plant apple trees if you live in Alaska. A Weeping Willow, illegal due to the waterline damage they cause, won’t thrive in the desert conditions of Arizona.
Research which trees thrive where you live. Look at the zone map for your area and make sure the trees you choose are appropriate for your edible food forest. You can find a zone map at Nature Hills website.

Choose the Correct Trees for your Purposes
Knowing the purpose of the trees you choose is very important. Tall trees are planted to provide protection from too much sun for the plants beneath them.
Make sure the species of trees you choose for your edible food forest will grow to do just that. Look at things like height and how far their branches spread at maturity so you can allow for this down the road.

This can be an issue if you live close to other homes. Just choose trees that will provide shade and meet your requirements for where your live.
Choose Low-Maintenance Trees
Remember that these trees are the tallest layer of your food forest. That means you may not be able to regularly prune and trim them as you may need to. Also, keep in mind that falling branches and limbs can damage other plants beneath them.
Make sure to choose sturdy, low-maintenance trees for these reasons. Piling ladders and ropes to trim branches constantly can be a challenge once your food forest is established.

Once you have chosen the appropriate trees for your food forest, you need to make sure they get a good healthy start. This means you now should consider the soil.
Preparing the Soil
Good soil is so important to the success of any garden, be it small or large. To have good soil, most of us have to amend it and add compost to it. In other words, most of us can not work at all with what we already have.
Instead, our current soil acts as a base to which we must add certain other parts to make it as usable and fertile as possible. You won’t have a clue what those amendments are until you test the soil.

Testing Your Soil
Testing the soil is simple. Take a sample, place it in a jar and take it to your local agricultural center. If you don’t have one nearby, you can pick up a soil test kit in just about any department or gardening store.
Home Depot and Lowes sell them pretty affordably. You can find a Soil test kit online.I won’t go into much detail about the testing, however, let’s talk about the ways you can amend the soil, based on your test results.

Amending Your Soil
Most plants grow extremely well in rich soil that is filled with organic nutrients and good minerals. After all, that’s what the forest floor is. It is a mixture of decomposed leaves, animal droppings, and moisture that have balanced out naturally over time.
You need to replicate that soil as close as you can in your edible food forest. To do this there are many ways to add to what you already have.

Amending the soil may include:
- Manure: chicken, rabbit, cow, horse, pig, and goat
- Hay: preferably weed-free if possible
- Dead plants, leaves, cut grass
- Wood Ashes: not recommended in large amounts (acidic)
- Compost
- Lime: used to neutralize acidic soils
- Fish Fertilizer
Keep in mind that the forest floor is never bare. It is covered by moss, leaves and branches. these act as a mulch layer to protect the soil underneath. You should never have bare soil either.
Related Post: The Ultimate Guide to Composting

How We Created Good Soil
We had a simple base to start with, sand. The good news is that it is very good for drainage. The bad news is that that’s all it is good for, nothing else.
So to the sand, we started adding compost. Tons and tons of compost. You can read about composting the best way in the links above.

Once we know where we are starting a bed, we mark off the area and start piling on all the good stuff. We add loads of compost, leaves and or straw or hay. Once we have all of those nutrients in the area we are planting, we simply use a hand rake to mix it all up.
This makes a good foundation to plant in for a food forest.
As time goes forward, we will actually add food scraps, more leaves, manure, and anything that is good for the soil every so often to keep “feeding” my soil. Sometimes those piles on your garden beds don’t look all that pleasing to the neighbors so if that is an issue for you, cover it all with wood chips or grass or leaves.

Just a note here: if you are starting off on a patch of grass, you may want to layer a bunch of layers of newspaper or cardboard to kill the grass. If you do this you want to pile new soil very thick for planting and concentrate on ground cover crops in those areas.
Use vegetables like melons and squash or even herbs and flowers until next year when the cardboard has decomposed enough for root vegetables. You can remove the grass also. We do not. We cover it up.

Planting Trees
Once you have decided what trees to plant in your food forest and you have your soil ready to go, it is time to plant. Find a good spot that gets full sun for your trees.
Make sure you allow enough room between them so that when they reach maturity, they are not crowding each other and blocking every bit of sun below them. Usually, the spacing and requirements of each tree will be listed on the tag of the tree.

You can also inquire about its needs from the nursery or gardener you get the tree from.
Plant your trees in the best space possible for your situation. If you live in an area that gets a lot of wind, you may want to secure your trees with some heavy string that is tied to a stake or two.
The taut string on each side should support the tree through any heavy wind. It also helps the trunk grow straighter.
Pecans, Walnuts, and Chestnuts may be good choices for the canopy layer as they grow up to 50 feet tall. These plants are normally placed on the northern side of the food forest with the smaller plants to the south.

This allows the smaller plants to receive enough sun during the beginning and end of the growing season when the days are much shorter.
If those types of trees are too tall, you may want to consider shorter varieties based on your planting site.
Bamboo is a great plant to fill in areas of your food forest. You can even start a bamboo farm! The bamboo canes can be harvested later for use as stakes for other harder plants.

Planting the Understory
In most food forests, the understory is made up of shorter fruit and nut trees. If you have planted saplings for your canopy, it won’t make sense to plant a smaller tree under them just yet.
However, if you are using an existing tree on your property of decent size or at maturity, you can now choose and plant your shorter rootstock trees.
Trees good for the understory may include Black Mulberry, Persimmon, and PawPaw trees. These and many other trees grow and produce well in partial shade. Make sure again to allow enough room between the trees to allow for growth.

Planting the Shrubs
There are many fruiting shrubs that grow well and produce in partial shade. Huckleberry, Beautyberry, and Currants are a few great choices for this layer.
Make sure when planting these shrubs you allow room all the way around for harvesting berries later.

Related Posts: American BeautyBerry: A Guide To Planting And Care
Planting Herbs
This is where the fun begins. This layer is all about constant, year after year activity.
The herb layer is not just for common herbs like rosemary, lavender and sage. This layer is all about perennial vegetables as well. Veggies like asparagus, rhubarbs, and tree collards are perfect for this layer.

Related Post: Growing Herbs For Self-Reliance
Planting Ground Cover and Vines
This layer is made up of the plants that grow along the ground. Plants like watermelon, squash, mint, strawberries, passionflower, grapes, and goji berries are included.
These plants provide edibles while attaching to the trees, shrubs, and any trellis-type structures they happen to encounter. Edible flowers also a great addition to this layer as well as medicinal herbs and flowers!

Related Post: How To Create A Medicinal Garden
Planting the Root Layer
The root layer of your edible food forest includes vegetables such as potatoes, turnips, and garlic. These are the plants you wish to consume that hide their edible parts beneath the top layer of the soil.

Special Notes
When you first start a food forest you may not have mature, 50-foot tall trees yet. It is ok to plant sun-loving plants closer to the smaller, newly planted trees.
However, as those trees grow and start to spread out you will want to replace those sun-loving plants with more shade-tolerant plants and move the sun-loving plants further out.
When planting vining species that climb, make sure that the surrounding plants or structures are strong enough to hold the weight of the vine when it bears fruit. Also, be sure that the vine will not be suffocating to the plant it is growing on.

Providing Water
Eventually, you should not have to water your food forest. In the long-term, it should be maintenance-free for the most part and will flourish from natural rainfall. However, when your just getting started, water is definitely something you need to take into consideration when designing your food forest.
There are many options for providing water in the beginnings of your edible food forest.
The Three Common Watering Types are:
- Ground Irrigation (soaker hoses and PVC DIY watering)
- Overhead Sprinklers
- Swales

Only you will know what is the most affordable and feasible way to water your newly-established food forest. We began with a hose connected to my rain barrels and hand-watered as needed.
Once the number of areas increased in size and hand watering each area became too time-consuming, we invested in a sprinkler.

Home Depot sold a tripod-type sprinkler that was height adjustable. It also had a great head on it. When we hooked the hose to it, it sprayed out in a circumference that watered almost my entire area.
We are currently designing and installing a PVC-type sprinkler that will attach to the top of the fence with circular heads. We are setting these up in zones so I can water one area at a time.
If there are spots the sprinklers won’t reach in the center I still have a try-pod sprinkler.
Related Posts: DIY Watering Systems
Swales
Swales have basically raised mounds of dirt that allow the water to stay or run where you need it to be. Hugelkultur beds work this way. Since our ground is so flat, we decided these were not for us. You can learn more about hugelkultur gardening below.
Where To Go From Here
Now you should have a pretty good understanding of what an edible food forest is, why it thrives, and how to get started. Do you see how creating a food forest can increase your self-reliance on your homestead?
Can you imagine walking out your front door and having all those edible goodies available and just waiting to be picked and consumed? Watch for the next post, How To Choose Plants For Your Food Forest, next week for more specific information on what you could start growing.
In the meantime download my FREE Garden Resources Mini-Ebook!
Make sure to keep following us as we continue on our road to reliance by providing our own food by means of a food forest. Let us know if you will start your own food forest on your homestead! If you have questions, please feel free to reach out to us and ask!
Be sure to check out How To Start A Survival Garden for yet another way to provide even more nutritious food for your family.
I am enjoying your posts. As a grandma doing my city-homesteading thing, I am always interested in learning new garden (food) ideas. I will be watching for more of your posts!
I am so glad you came by! And I am looking forward to our new friendship! Many more are on the way!