
Do you want to start a survival garden in order to grow your own food for survival instead of depending on the grocery stores?
With pandemics and food shortages being talked about every day, survival food is becoming a popular topic. There may come a time when buying enough food could be a challenge, especially for larger families.
Taking the time to plan and prep before the need arises will be a smart choice on your part. And when you start a survival garden in your own backyard or on your farm or homestead, you will be prepared and ready for any food emergencies that may take place.
In this ultimate guide to starting a survival garden. I will teach you everything you need to know to get prepared for any food emergencies this season.

Just so you know: This post contains affiliate links; if you click on a link and make a purchase I might make a small commission, but it does not affect the price you pay! For more information, please see my Affiliate Disclosure.
What is a Survival Garden?
A survival garden is a plot of land that is designed to grow food and medicinal plants in order to provide enough nutrition and medicinal qualities for a family to survive in an emergency.
This is not the traditional backyard vegetable garden you are probably used to. Instead, it is a well-thought-out, specifically planned garden based on the number of people it must nourish for survival.

What Nutritional Needs Must Be Met?
Meeting your family’s nutritional requirements is most important. There are a few things you must take into consideration when it comes to staying healthy.
On average, most adults will require between 1600 and 2500 calories per day. Children require between 1000 – 2000 calories per day. These numbers are needed to sustain everyday activity levels.
Calories are not all we need though. We must also receive the right amount of vitamins, minerals, protein, fat, and carbs.
Because we need all of these nutritional elements in our diets, what we grow in the survival garden matters, and must fulfill our nutritional needs.
However, before we start planting and growing we must learn why and how to start a survival garden in the first place.

Picking a Site To Start A Survival Garden
Knowing what a survival garden is and what it needs to provide for us, means we need to decide where to plant the survival garden. There are some important considerations to keep in mind well before you actually start your survival garden.
Light
Regardless of where you choose to start your survival garden, one thing it must have access to is light. Plants need light to complete photosynthesis.
A spot that receives at least 8 hours of sunlight is best. Each plant will have specific amounts of daily sunlight it requires. We will discuss that later when we talk about the plants for your survival garden.
Plants in southern climates, such as Florida, Texas, and other tropical areas, may want sunlight, but not direct sunlight for the entire 8 hours. This is because being closer to the equator means higher temps.
Some plants like lettuce can’t take that kind of extreme heat whereas tomatoes and peppers love it. Know just how hot your ideal spot may get ahead of time. You may need a spot of partial sun.
If you do not have an outdoor spot in direct sun, consider a patio or deck. If neither of those are an option, the alternative is to consider indoor gardening.
The only addition you need for an indoor garden are some really good grow lights and space to set pots and shelves. These grow lights are necessary for photosynthesis to take place when the plants do not receive any natural sunlight.

Season and Climate
Just as northern, cold climates can’t usually start plants in the ground in January, southern, tropical climates don’t normally start any plants in June or July because it is too hot.
Take into consideration your seasons and climate for planting.
Learn your first and last frost dates for your area. Knowing this will give you a better idea of when you can start some seeds indoors in order to be ready to plant outdoors when the weather is appropriate.
You can learn this information by going to the USDA website and looking up your garden zone. Most seed packets you buy will give you the planting instructions based on the zone you live in, so knowing this information is important.

Access To Water
Plants absorb water through their root systems. This makes how you water very important. Consider installing drip irrigation or another DIY Watering method before you start planting in your garden.
Rain barrels are also a great way to water as long as your garden plots or containers are close enough to the barrel’s location. You don’t want to have to stretch your hoses too far when watering. Especially if there are a lot of obstacles like other plants in the way.
Installing irrigation can be costly, but so can losing all of your gardening investment due to lack of water.

Nutrient Rich Soil
All plants draw nutrients from the soil that surrounds their roots. Of these nutrients, three are the most important. They are nitrogen, phosphorus, and potassium (often referred to as NPK).
When you pick up a bag of fertilizer, you will see 3 numbers separated by dashes. These three numbers stand for the percentage of nitrogen, phosphorus, and potassium in that order.
So if the bag reads 10-10-10, it means 10% nitrogen, 10% phosphorus, and 10% potassium.
Although there are other important nutrients such as calcium, magnesium, and sulfur, just remember NPK for now.

Let’s Talk About the Soil
Since you want to start a survival garden and provide the most nutritious survival foods for your family, having the best soil is very important.
There are four main soil types – sand, silt, clay, and loam.
Sand is made up of large, coarse particles. These large and hard particles make the sand easy to work with but are basically worthless when it comes to nutrients and holding any water.
Silt is made up of particles larger than sand and is usually found near a water source. It is very fertile, but it can become compacted easily and that is not good for plants’ roots.
Clay has particles that make it very thick and very heavy. Clay holds water and nutrients but sometimes too well for plants liking. When clay is wet it is pliable but when it dries it can resemble the hardness of a brick.
Loam is a good mix of sand, silt, and clay. It also has a fairly good amount of organic matter in it which makes it the perfect soil for most plants. It drains easily, while still holding moisture and nutrients.
So how do you know what type of soil you have?

Soil Testing
Your soil is going to be one of the four or even a mix of two or three of the above types. If you aren’t sure, you have two options.
The first option is to purchase a soil testing kit at a gardening center or even free at an Agricultural Extension office in your town.
This test is simple, you simply add some soil to the container and send it in or take it in and wait for the results.
The second option is to perform a soil layer test.
Performing A Soil Layer Test
- Get a clear 1-quart glass canning jar with a seal and lid.
- Fill the jar 2/3 full of water.
- Fill the jar with soil almost to the top.
- Add 1/2 teaspoon of laundry soap to the jar. (Helps the layers separate better)
- Shake the jar vigorously for 30 seconds to mix all of the ingredients.
- Set the jar in a place undisturbed for a couple of days.
Look at your jar without disturbing it each day. You will start to notice layers forming.
Sand is the heaviest so it will fall to the bottom. The next layer will be the silt. The third layer will be clay.
Above that should be murky, but semi-clear water. At the top will be any organic matter.

Reading the Results
When it is clear which layer is which, you can measure the layers. Figure the height of each layer. Write these down.
Next measure the entire height measurement to the top layer. Now divide the height of each layer by the total height of all the layers. Write these percentages down.
Example: If the settled height of your soil is 2.75” and each layer is as follows:
Sand = 2” high
Silt = .25” high
Clay = .5” high
Then divide 2 by 2.75 which equals 70%, divide .25 by 2.75 which equals 10%, and divide 0.5 by 2.75 which equals 20%.
So in this example, you would have 70% sand, 10% silt, and 20% clay.
USDA’s National Resources Conservation Service’s Soil Textural Triangle
By marking your results and connecting the three lines, you will see exactly what your soil type is. It is the dot where the three lines you drew meet.
Now it is time for the amendments.
Soil Amendments
There are basically only two types of soil amendments – organic and inorganic. Organic amendments occur naturally and can include the following;
- Kelp or seaweed
- Blood meal
- Manure
- Compost
- Bone meal
Inorganic fertilizers would be commercial amendments like granular fertilizers that are sold in garden supply stores and are not marked as “organic”.
There is a fine line with the term organic here. Buying cow manure seems as if it would be organic right? After all, it comes from the neighbor’s cow right?
But if the cow received antibiotics, is fed a commercial grain, or eats from a field that was treated with chemicals over the last few years, that manure is NOT organic.
No matter what type of soil you find that you have, eventually you will be adding amendments.

Mulch and Cover Crops
Using mulch is a common practice in many gardens. And when you start your survival garden, mulch will become a new best friend. Try to use mulch that won’t take away nutrients from your plants.
Leaves are often used, however, they can pack together making a matting that can suffocate your plants. They also absorb nitrogen from the soil as they break down. This nitrogen is from the nearby plants.
Wood chips are used frequently. However, if you are going to use wood chips, save them for the paths you walk on because like leaves, they too rob the soil of nitrogen.
Comfrey can be used as a chop-and-drop option. Whatever mulch you use, just be smart.
The second option is to grow cover crops between planting times. This is often done over winter or between planting times.
Basically, you grow a crop such as ryegrass, or clover and then till it right into the soil to add nutrients for the next set of plants coming in.
If you use a no-till gardening method, cover crops may not be the answer as it requires tilling.

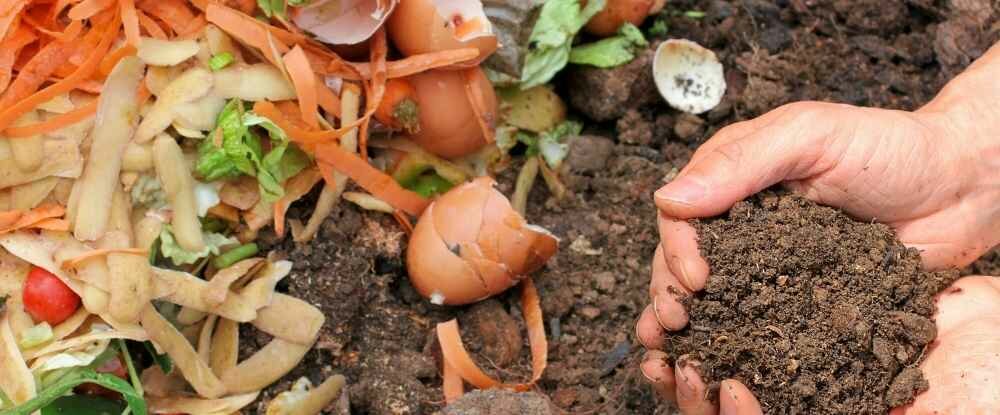
Compost
As a survival garden gardener, your new best friend will be the compost pile. But if you want to use your own “black gold” of the gardening world, you better start that compost pile way before you start planting!
Read More: The Ultimate Guide to Composting at Home
Composting is the process that recycles organic matter into fertilizer which then feeds soil and plants. It provides an ideal environment for bacteria, fungi, and other decomposing organisms to do their jobs. The result is rich “black gold” for your gardens.
Every person who wishes to grow a healthy organically rich self-reliant garden should be practicing the art of composting.
Types of Gardens
There are many ways that people create gardens. When you start a survival garden you may want to use a few different types of garden styles The type of gardening you do will depend on the size you have available and what you want and need to grow.
If you have never gardened before, start small. Raised beds and containers are a great way to learn gardening but don’t be afraid to try in-ground gardening.
In the meantime, let’s discuss the types of gardens you can use to start a survival garden.
Row Crops
Row crops are the “standard” method of gardening in the US. This form of gardening only became the standard because it originated from farmers who operate big machinery when planting.
Planting in rows simply makes sense when using big machines, but not so much in the garden for the average person or homesteader. Planting in straight lines allows big machinery to have enough room between plants later on.
For you the smaller farmer and gardener, you want to use every bit of space you have available. So with a survival garden, row crops really aren’t feasible for saving space.

In-Ground Beds
An in-ground bed simply means you can plant directly in the ground. These beds are commonly rectangular in shape, and the average size is 4’ x 8’.
A popular method of starting an in-ground garden bed is to double dig. This is where you shovel out trenches, break up the soil with a garden fork, then fill in the trench with the soil from the next trench you dig.
This type of digging is a lot of hard work. But it allows for a well-drained bed of soil to plant in.

No-Till
Some people prefer not to dig and disturb their gardens. Instead, you will pile on the organic matter which creates a new layer of soil.
This type of gardening requires a lot of materials such as; leaves, hay, compost, straw, and wood chips. It eliminates many gardening problems like poor soil and weeds.
The Back To Eden garden method is an example of this type of gardening. You can learn more about Back to Eden Gardening in the video below.
Mounds
Mounds are created by digging a hole and using the dirt you remove to make a mound. The most common example of mound planting is with the 3 sisters method.
In the three sisters’ method of planting, corn, beans, and squash are planted together. Corn is used as a “trellis” for the beans to grow on. The squash is used as a ground cover to suppress weeds.
When building the mound, organic matter such as a dead fish is buried in the mound before planting. The fish acts as a time-release fertilizer.

Containers
If you do not have enough space to start a large survival garden, don’t fret, containers may be just the answer for you. Everything from greens to corn can be grown in a container. Potatoes can even be grown in a tote.
For more information see: How To Start A Container Garden For Beginners
Raised Beds
Raised bed gardening is basically building a shape from wood or other materials above ground, filling it with soil, and planting in it. Some sit directly on the ground and other will have a bottom and can even be built on legs.
These types of gardens are good to use in your survival garden especially if your in-ground soil is not the greatest and you wish to start gardening immediately.
The downside is that they can be costly to build and even more costly to fill if you have to purchase all of the soil and organic matter to fill them.
For more information, see: Using Raised Beds for Gardening

Hydroponics
Hydroponics is growing plants without any soil. Instead, water that has added nutrients and oxygen are passed over the roots to allow for plant growth.
This form of gardening allows gardeners to grow food anywhere they want, including a closet. Watch the video below for an easy DIY Hydroponics system you can build for your home or property.
For a great resource for everything hydroponics, see, Keep Growing with Mike Duzee.
Orchards and Edible Food Forests
If space allows, growing an orchard or even an edible food forest is always a great addition to a survival garden. You can then add fruit trees, nut trees, and more to increase the amount of survival foods you can provide for your family.
Check out my other site, 15 Acre Homestead for my edible food forest posts. They are How to Establish a Fantastic Edible Food Forest Easily and The Most Popular Options For Food Forest Perennials.

Choosing Plants for Your Survival Garden
When choosing plants for your survival garden you want to try to grow a variety of foods to accomplish meeting your nutritional requirements.
Pay attention to what you normally use when cooking for the week. If you eat 2 pounds of potatoes per week, multiply 2 x 52 weeks. This comes out to 104 pounds of potatoes in a year. That’s the minimum amount you will need but always allow for extra.
You can find a great calculator here at Morning Chores.
Types of Food To Grow
I cannot possibly tell you in one single post how to plant every optional plant when you start a survival garden for your family. However, I can make suggestions. From there you will have to do your research.
Determine what grows in your area and when the best time to plant is. This research is important to have a successful garden of any type.
You will also have to research plant spacings, seed depth, light requirements, and so forth on each plant, you wish to grow. You must also determine if you want to start with seeds or starters.
By doing as much research on your particular situation as possible, you will be rewarded with a bountiful survival garden that provides the nutritional requirements for your family.
Grains
Grains are necessary if you want to have flour and variety in your diet, Grains are very healthy for your body. Types. of grains to consider are:
- Amaranth
- Wheat
- Barley
- Corn

Vegetables
Vegetables are also necessary for healthy meals. Most every garden grows vegetables. However, when you start a survival garden, try and choose vegetables that provide a lot of vitamins.
Head lettuce for example is not recommended since there are not many health benefits in it. Instead, try growing Romaine or leaf-type lettuces that provide nutrition instead. Potatoes are an excellent starch and carbohydrate to add to your diet. And they store extremely well.
Some vegetables to grow for your survival garden may include:
- Jerusalem artichokes
- Asparagus
- Beets
- Carrots
- Cucumbers
- Egyptian Walking Onions
- Garlic
- Green Beans
- Kale
- Lettuce
- Mushrooms
- Onions
- Peas
- Peppers
- Potatoes
- Radishes
- Rhubarb
- Ramps
- Summer Squash
- Tomatoes
- Winter Squash

Fruit
The type of fruit you grow will depend on your climate. Even in a northern climate, dwarf fruit trees can be grown on a porch or deck and brought in throughout the colder months. In tropical climates, you can plant citrus and other fruit trees right in your yard.
Don’t forget to plant berries and possibly grapes too. Having some fruit on hand not only provides vitamin c and other important vitamins, but it allows us to make jams and jellies.
Suggestions for fruit may include:
- Melons
- Strawberries
- Blueberries
- Other berry bushes
- Grapes
- Citrus
- Dwarf fruit trees

Proteins and Fats
Your body needs certain amounts of fats and proteins. Some great ideas for planting to provide these include the following:
- Soybeans
- Dry Beans
- Sunflowers
- Peanuts
- Tree Nuts (hazelnuts, pecans, etc.)
- Avocados
- Olives

Herbs
Herbs can be divided into two types – culinary herbs and medicinal herbs. Some herbs can be both. Do your research and learn what each herb can be used for, both for cooking and medicinally.
Growing culinary herbs in your survival garden will allow you to add some different flavors to your foods. Medicinal herbs will allow you to fill your apothecary with wonderful home remedies that you may need for survival, especially when medicine and bandages may not be able to be found or purchased.
Culinary herbs may include:
- Basil
- Oregano
- Rosemary
- Thyme
- Chives
- Sage
- Parsley
- Dill
- Cilantro
- Cumin
- Mint
- Nasturtium

Medicinal Herbs may include:
- Echinacea
- Chamomile
- Valerian
- Lavender
- Calendula
- Holy basil
- Witch Hazel
- Lemon Balm
- Peppermint
- Tumeric
- Ginger
- Gingko
- Feverfew
- Garlic
- Horseradish
- Skullcap
- Wormwood
- Hyssop
- Anise
- St. Johns Wort
- Licorice
- Angelica

Other Medicinal Plants to Consider
Some plants have become popular recently that prior was only found when foraging. Some of these plants were once considered weeds.
We know are armed with the knowledge of just how beneficial these plants are, both for nutrition and medicinal purposes.
You can order seeds from heirloom seed companies such as Bakers Creek Seed Company. You can plant these “foraged” plants directly where you want them to grow instead of having to hunt for them in the wild.
These “foraged” plants include:
- Stinging Nettle
- Plantain
- Dandelion
- Yarrow
- Bee Balm
- Burdock
- Purslane
- Thistle
- Marshmallow
- Chickweed
- Red Clover
- Willow
- Mullein
- Juniper Berries
- Rose Hips

Natural Sweeteners
Having a natural source of sugar like honey is great but having other forms of sweetness is always handy. You can grow a couple of plants that provide sweeteners right in your survival garden.
Consider the following plants for a source of providing sweetness for survival foods:
- Stevia
- Sugarcane
- Maple Trees (for tapping syrup)

Other Plants To Use for Non-Food Items
Do not forget about other uses for plants besides food. For example, cotton can be used to make bandages, yarn, and even clothing once you learn the skill of how to use it correctly.
Building materials you may need can come from plants such as bamboo, willow, pine, oak, and many other trees and woody shrubs.
And don’t brush off the hemp plant. With hemp, you can make paper, fuel, rope, and even clothing.

Preserving the Harvest and Saving Seeds From Your Survival Garden
The last consideration for your survival garden is how you will use and preserve your harvest, and how you will save seeds from your garden for the following years.
Preserving the Harvest
Preserving your survival food is very important. You may be traditionally freezing all of your food currently. That’s great. But what happens if the grid goes down? What do you do to save all of that frozen food?
You must learn preserving skills that do not require a fridge or a freezer. These are specific prepping skills you should add to your list of important self-reliant skills.
Some great ways to preserve food include: (links for more information and how-tos follow the skills)
- Smoking – Masterclass.com
- Salt Preservation – Survival-Manual.com
- Utilizing a Root Cellar – Common Sense Home
- Dehydration – Fresh Off The Grid
- Freeze Drying – Freeze Drying Mama
- Canning – Hidden Springs Homestead
Seed Saving
Saving seeds is very important if you want to continue to grow food each year, especially when and if seeds are not available for purchase. Learning how to save seeds is easy for most plants.
Most plants will flower if not harvested. Those flowers then turn into seed pods, and that is when your seed-saving process begins.
Make sure when planning your survival garden, you allow for some extra plants specifically grown for the seed-saving process.
Here are a few resources for learning how to save your seeds:
Roots and Reuse Farm has an excellent video for learning how to save seeds. See the video below.
- How To Save Vegetable Seeds from The Almanac
- A Step by Step Guide to Saving Herb Seeds from Hobby Farms
- How to Save Seeds From Wild Plants from Edible Wild Food
- How to Harvest Fresh Seeds From Fruit from home guides.sfgate.com
Below is another great video on saving this year’s seeds for next year.
Other Things to Take Into Consideration
Food grown from plants is not the only item you may want in your survival garden. You can add a few rabbit hutches too. Rabbits are an excellent source of protein and their manure can go directly into your garden beds immediately.
You can dig a small pond or turn a swimming pool into a freshwater pond to provide your family with fish. You can also turn a pond into a saltwater pond and grow shrimp and other saltwater animals.
Throw in some chickens! Chickens can provide both meat and eggs. Raising a dozen chickens near or even in your garden also provides another form of fertilizer for your plants. If you don’t have enough room in your garden, chickens can be kept in cages in a garage if necessary along with rabbits.
Other considerations may include raising a few ducks or quail. Both leave you with very tasty eggs.
Consider what additions you can add to your survival garden to provide the necessary food for your family. Be creative. Remember, there could come a time when all of those “wish I had thought about” animals and plants may not be an option anymore.

Final Thoughts
When you start a survival garden this season, you will be taking the necessary steps to be prepared for an emergency situation ahead of time. You will be able to provide nutritious meals for your family right from your own property.
Do your research, then get started. Plant what you can and as much as you can. Add variety. With some creativity, you can start a survival garden that will continue to provide food for years to come.
Check out my FREE Survival Garden Guide Workbook below for some quick tips to help you get started on your journey of making a Survival Garden.

What a thorough post! You’ve really covered a lot in this post! It’s so important to provide our own food in these times!
I’m featuring your post on tomorrow’s Sunday Sunshine Blog Hop! Congratulations!
Keep the good articles coming!
God bless!
Laurie
Ridge Haven Homestead
Thanks so much! I love your blog hop and I hope I can help others as well!
Annie –
Thank you so much for giving such a detailed and thorough post on creating a survival garden. I so appreciate all of the time you took in sharing your information. I am jazzed about getting started.
So glad that it inspired you!!!! Let me know your progress.
Well done and easy to follow. Thank you.